Sunday, March 3, 2013

Veggie Bake

I decided to throw together a little veggie bake when I had a few different kinds of vegetables on hand and a jar of pasta sauce open.


Veggie Bake

Ingredients:
- Roasted eggplant
- Sliced tomato
- Sliced zucchini
- Spices like basil, oregano, crushed red pepper, smoked paprika
- Pasta sauce
- Nutritional yeast

Preheat your oven to 350 degrees.  Lightly oil a casserole dish - I used a small one since I wasn't using that many vegetables.  First add the eggplant.


Then the tomatoes.


Then the zucchini.
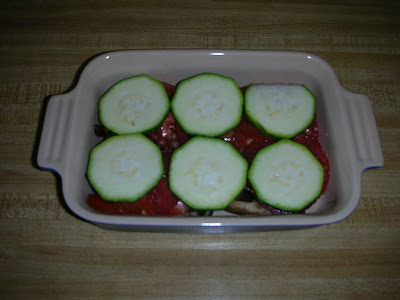
Woops, blurry picture.

Then sprinkle on each of the spices.


And then pour pasta sauce over the top.


Followed by a very liberal topping of nutritional yeast.  You could definitely use cheese here instead, if you prefer.


Bake for about 30 minutes, until the sauce looks set around the edges and the vegetables are tender.


I enjoyed a portion with some delicious figs on the side.


I think it would also be great served with some noodles or rice, or with some crusty bread to soak up any extra sauce!


It reheats well, too.  This recipe is extremely adaptable - just use whatever vegetables you have on hand and as many or as few spices as you prefer.

I hope you're having a good weekend!  Here's some pictures from mine.

On Friday I had a rare day with no set obligations, so I decided to spend some time at the mall.  I had a coupon for free underwear (gotta love Victoria's Secret) and a coupon for a free tea from Teavana.  Other than that I just browsed and got in some mall cardio.  Oh and I treated myself to my favorite lunch - a chicken pesto crepe and some Perrier!  So good.


Last night I went out to dinner with some friends to a great place called Happy Dog.  It's pretty incredible - you choose whether you want a beef or vegan hot dog, and then you can choose AS MANY toppings as you want, and it all costs $5.  And you can also get French fries or tater tots with unlimited sauces for $3.  Um, yes please.  I got a beef hot dog with marinated cremini mushrooms, caramelized onions, sun dried tomato tapenade, and applewood smoked bacon.  I also got an order of delicious tots with homemade ketchup.  And an extremely delicious beer per my friend Laura's enthusiastic recommendation - Willoughby Brewing Co. peanut butter cup coffee porter.  Yes, you read that right - peanut butter cup coffee!!  Tasty.

In addition to delicious and affordable food, Happy Dog has live music, so it's basically my idea of a perfect hangout spot.


I got to hang out with some great friends, too - pretty good weekend in my book.


And here's a sunset picture because I can't resist.  Especially these days when anything other than a gray sky is a rarity!


Song of the day:

"Heartbeat" by Kopecky Family Band.  I'm going to see their concert next week and I'm so excited!


Wednesday, February 27, 2013

Cheezy

It's a miracle.  I'm actually writing a blog post...  my first one since the beginning of January.  Woops.

So for those of you who don't know, I am a pretty picky eater.  I don't like quite a few things, like seafood (I've tried!), mustard, cheese, etc.  Actually, I do like a couple kinds of cheese:  Kraft macaroni and cheese (but only the shapes - not the normal elbow noodles - it's all about the cheese to noodle ratio), and cheese on pizza.  But I think we all know that Kraft mac and cheese has less than stellar nutrition stats and ingredients.  (But the shapes are fun, you have to admit - who doesn't want to hang out with Spiderman or Spongebob at dinner?)  Also, I've been avoiding dairy as much as possible for the last few months - I was getting a lot of upset stomachs, and my skin was going kind of haywire, and I think avoiding dairy has really helped.


Anyways... when I saw Angela's recipe for Butternut Squash Mac 'n Cheeze, I knew I had to try it.  And I'm so glad that I did.  Finally, a homemade mac and cheese that I can enjoy!  And this one definitely does have some stellar nutrition stats.


I used a fresh butternut squash, extra virgin olive oil, Earth Balance, almond milk, cornstarch, nutritional yeast, Dijon mustard (even though I don't like mustard, I couldn't taste this specifically), garlic powder, onion powder, lemon juice, kosher salt, pepper, whole wheat shell pasta (not as fun as shapes, but close!), spinach, and broccoli.


Even though it wasn't quite as good warmed up as it was freshly-made, it was still really tasty and I got 4 or 5 meals out of it!  I heart leftovers.  I know, I'm weird.


So if you're like me and don't like cheese (please tell me there's someone else out there like me!), or if you're avoiding dairy, or if you love butternut squash, or if you just like good, healthy food - try this recipe!  You'll like it.

I'm really going to try to post more regularly.  I haven't been doing a great job of balancing school stuff with healthy eating and exercise, so I need to hold myself more accountable.

Song of the day:

I can't stop listening to "Emmylou" by First Aid Kit.  It's heartbreakingly beautiful.


Thursday, January 3, 2013

Homemade Turkey Soup

Happy New Year!

I really don't know where the time has gone, but way back in November, I cooked my first turkey for a Thanksgiving-themed potluck that I hosted for my friends.  I was very nervous but I think it turned out fairly well, and overall it was actually pretty simple.  Even though my friends made a good dent in the turkey, I still had quite a bit left over.  I enjoyed adding it to salads for lunch and heating it up for dinner, but I got to the point where I really didn't want any more turkey, so I decided to put the rest into a soup.

Woops, forgot to get a picture before the turkey was carved.  Sorry for this blurry one!
I just added ingredients as I went and hoped for the best.  It kind of reminded me of the "button soup" story - did anyone else read that when they were younger?  Anyways, I was actually really surprised by how well
it turned out!


Turkey "Button" Soup

Ingredients:
- 15 cups of water
- 5 vegetable bouillon cubes
- about 10 green onions, sliced
- about 4 carrots, sliced
- leftover turkey, torn into pieces
- about half a bag of frozen spinach
- 1 can of cannellini beans, rinsed and drained
- a pinch of dried rosemary
- a hefty shake of dried basil
- 2 bay leaves
- about half a bag of whole wheat egg noodles

Simmer all of the ingredients, except for the egg noodles, in a big pot for about an hour or so, and then add the egg noodles and let it simmer for about another 30 minutes.  Remove the bay leaves before eating.

I'm not very good at photographing soup/ steamy things.
This recipe is extremely easy to customize based on the ingredients you have on hand - you could substitute another type of leftover meat (i.e. chicken, ham, beef roast, etc.) or leave out the meat altogether, use another kind of onion, different kinds of frozen or fresh leafy greens, use different kinds of beans, change up the spices, etc.  The possibilities are endless!

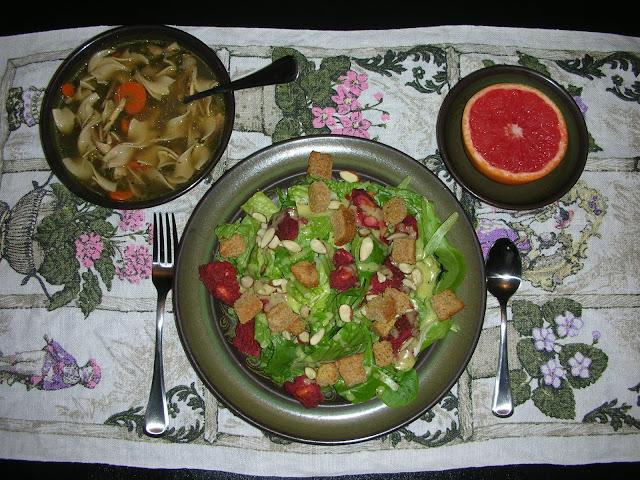
This is a much better picture of the soup, which I had as part of my dinner one night.  I also had a salad with romaine lettuce, a crumbled carrot, beet & bean burger, sliced almonds, and homemade croutons, with half a grapefruit on the side.  
The soup kept well in the fridge for quite awhile and was great to heat up for lunch or dinner.  Even then I couldn't finish it all, so I froze the rest of it and will pull it out sometime during the next semester when I need a quick already-made meal.  I love that I know exactly what's in it, as opposed to store bought cans of soup.

Normally when I make up recipes as I go (which is a very rare occurrence), the results don't turn out very well, but this was definitely an exception.  I'm glad I learned that homemade soup is actually very simple and doesn't take much effort at all!

I hope the new year is off to a great start for everyone!  I got a new phone for Christmas and I've been having fun playing around with the camera on it.  I'm really excited that it can easily take panoramic pictures! I took this picture on a little family trip to Michigan.


Song of the day:

"Coyote" by The Lonely Forest.  My friend Caitlin turned me on to this band and I'm kind of obsessed with this whole album, which is called Arrows.


Wednesday, December 12, 2012

Furniture Facelift

If you remember way back to the summer, I was working on a little DIY project - painting my kitchen table and chairs - which took much longer than I anticipated.  But I guess that's the way DIY projects usually go, right?  I'm finally getting around to sharing my process in case you want to give some of your furniture a facelift, too!  I got most of my information from this Young House Love tutorial, as well as some tips from a guy who works at the Sherwin Williams store and from my dad.

I started with a table and chairs which my best friend generously gave me when I moved into my apartment.  They were originally dark green, and my friend had spray-painted them blue and pink.


My first step was cleaning the table and chairs very well, using this trisodium phosphate, mixed with water according to the directions on the box.  I made sure to wear rubber gloves while using this because it is very strong.


The next step was sanding everything down.  I used this 100 grit sandpaper.  I opted not to use a sanding block because I was going to have to get into a lot of small areas, like the spindles on the backs of the chairs.


Per my dad's suggestion, I cut one sheet into 3 equal lengths.


And then folded each piece into thirds.  This made the sandpaper easy to manage, and when one side was worn down, I could quickly switch it to a fresh side.


After I was finished sanding, I sucked up some of the dust with a shop vac.  Then I used a tack cloth to wipe down the chairs and table really well.  The tack cloth is slightly sticky (so it feels kind of gross to hold it) but it works really well to get the surface as smooth and clean as possible before starting to paint.  You can see that the tack cloth in the plastic is completely white, and the used tack cloth on the right is full of paint that came off from the sanding.


Next:  finally time to get some paint on there!  Well, kind of - primer first.  The Sherwin Williams guy tinted the primer to a gray color.  I used an oil-based primer.


I almost completely forgot to take pictures of the chairs and table after I primed everything - I remembered just before I painted the top of the table black.  The top of the table is what it looked like after a coat of primer, and the table legs have primer and one coat of black paint on them.  


After everything was primed, it was time for the first coat of paint.  I also forgot to take a picture of the black paint I used, but it was a black latex paint with a semi-gloss finish from Sherwin Williams.  I used a paint brush on the chairs and the legs of the table (the one pictured above with the primer), and a foam roller on the top of the table.


After my first coat of black paint, I sanded down some spots which were a little rough and uneven.  It was difficult to paint around the spindles of the chairs, so this area needed extra sanding.  (Which also meant more vacuuming and wiping down with the tack cloth - phew.)  In hindsight, I should have gotten a smaller brush to paint these areas.


Then it was time for the second coat of black paint, and some additional touch-ups after that.


When I was satisfied with the black paint, and after everything dried really well, it was time to put a protective finish on everything.  Per the guy from Sherwin Williams, I put on one thin coat of finish, then I lightly sanded it with very fine grit sandpaper, wiped it down with a tack cloth again, and then put a second (and final!) protective coat on.


FINALLY finished.


It took a lot longer than I was expecting.  Thank goodness for the NPR app on my phone and lots of entertaining podcasts like Weekends on All Things Considered, Car Talk, and Wait Wait... Don't Tell Me!  I think my dad got a kick out of seeing me spend so much time in the garage listening to Car Talk - I'm finally following in his footsteps :)  Kind of.

My final step was hammering some plastic floor protectors into the bottom of each chair (I drilled pilot holes into the legs first so that they'd go in straight and the wood wouldn't split).  I previously used felt floor protectors, but they didn't look very nice and tended to move and/or fall off.  I'm happy with the plastic floor protectors.


I think the time was worth it, though - I love the results!  And it's satisfying to see my table and chairs every day and know that my hard work paid off.  I have to say, it's made me think about what other DIY projects I can take on to give some other things in my apartment a little facelift.  I've got my eye on a VERY outdated brass lamp at the moment.

Song of the day:

Since it's December, I think I'm going to share some of my favorite Christmas/ holiday songs.  This one is actually not much of a song, but it's a classic.  "Santa Claus and His Old Lady" by the inimitable Cheech and Chong.  Enjoy!  "Once upon a time about, mmm, 5 years ago..."


Saturday, December 1, 2012

Continuing the Tour

Well this is the longest apartment "tour" ever.  I shared pictures of my kitchen and my living room in previous posts, and now I'm finally getting around to sharing some pictures of the rest of my apartment.

When you first walk into my apartment, you see my living room on the right.


Straight ahead, you see my coat closet.  One of the things I love most about my apartment is all of the storage!  Having a coat closet is pretty luxurious, in my opinion.


To the left, there's a door into another closet - this one is a walk-in!  Talk about luxurious.  There's also a door into my bedroom from this closet.


If you continue down the entry hall, my bedroom door is on the left, and the bathroom door is on the right.  Also, straight ahead you'll see one of my favorite gifts ever - it's a picture my best friend took at a concert we went to together which she had framed for me.  I absolutely love it.


That's the door to my bathroom.


Here's the bathroom.


It was actually the first room in my apartment that I decorated - it seemed a lot more manageable and less daunting than the other rooms because it was much smaller.


I bought 10 picture frames from a dollar store and had some pictures printed out in black and white to put in the frames.  I love this because it was very cheap, and it's also easy to switch around if I want to.  I can swap out the pictures easily, and I just have them leaning on that ledge, so they're easy to move around, too.


That ledge goes all the way around my bathroom, so I continued the frames around the room.  I have one black and white print from Etsy among my own photographs.  I got the mat and frame from Hobby Lobby, so that was very affordable, too.


The photos I chose are a mix of places I've visited and concerts I've been to, so they all have a special meaning to me and are fun to look at throughout the day.


Leaving the bathroom, you'll see my linen closet in the hall.  I absolutely love having a linen closest to hold towels, sheets, some cleaning supplies, and extra toiletries.  I'm spoiled with all of this storage!


Past the linen closet, you can see my front door.  The doorknob in the right of this picture leads into that walk-in closet I showed above.


There's nothing very exciting about the decor in my bedroom, so I'll just highlight a few things in there.  This is the door from my bedroom into the walk-in closet.


And here's my other bedroom closet.  I told you - spoiled with storage!  It's nice, but at the same time I know I've accumulated a TON of stuff since I moved into this apartment - out of sight, out of mind, right?


This is the view from my bedroom window.  I love it!  I could have cut the curtain rod down a little bit, but since I don't spend a ton of time in my bedroom, I didn't worry about it.  It looks pretty silly in this picture, though!


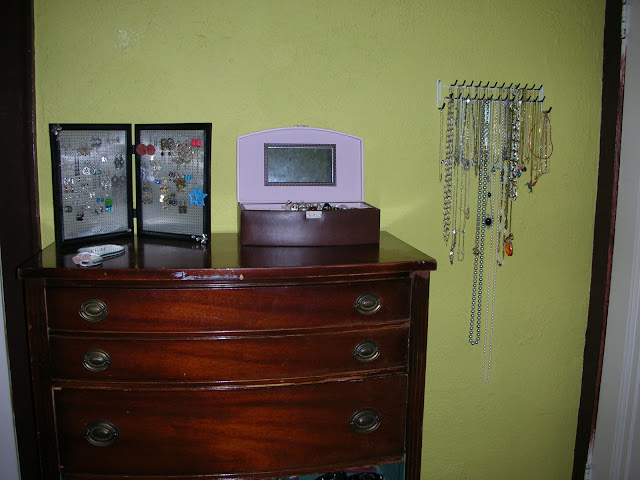
One of my favorite things that I've done in my bedroom is my jewelry storage system.  (I know, I'm a dork.) I have an earring holder, a jewelry box, and I hung a tie rack to store my necklaces.


I used to keep all of my necklaces in my jewelry box, but it was so hard to see them all and I just ended up wearing the same things over and over again.  This way I can easily see all of them and quickly pick out what I want to wear.  It also prevents them from getting tangled!  The tie rack was about $10 at Wal-Mart, but I did recently see an idea for making your own necklace holder using wood trim and upholstery tacks, which I think would look nicer.  One day I'll try that out!


I love my earring holder for the same reason - I can easily see all of my options at once and pick out what I want to wear.  My parents got that earring holder for me as a present a few years ago, but it could be a fun DIY project, as well.  And now it's a lot easier to find other things like rings, bracelets, and watches in my jewelry box since I don't have earrings or necklaces in there!


The dresser that my jewelry box and earring holder are sitting on was actually left here by the previous tenant.  It's missing two drawers, but the previous tenant had the clever idea of painting the wood where the drawers should be and using that space as a shoe storage area.  Works for me!


Well there you have it - the rest of my apartment tour, with some cheap decorating tips and storage solutions thrown in.

I've got 2 finals in the coming week, and then I'll be finished with this semester.  Only one semester left to go - I can't hardly believe it.  It's scary and exciting at the same time.  I can't believe it's already December!  Along with my studying, I need to get my Christmas decorations up ASAP :)

Song of the day:

"Trouble Ahead" by Little Hurricane.  This entire album, Homewrecker, is really great.